


Learn about React state management and then build a React Counter component.
This article is a continuation of my first article which gave a practical introduction to the React JavaScript library. In this article, I’ll introduce the concept of state in React and how to implement it in a react component.
Let’s dive in...
What’s React State? 🤔
“State is just a fancy word for a javaScript data structure”.
It’s a means by which React components are able to store bits of data that can be used by the component. A state value can be of any data type i.e. String, Number, Boolean, or an Object. It’s important to note that unlike variables defined in a component using let or const, state values can be manipulated and they remain persistent during subsequent component re-renders.
In react, state can either be Local or Global.
Local State: This is the data that is used inside a single app component. It can be created and managed using the useState hook in a function component.
Global State: This is the data that can be accessed and used by multiple components in a react app. There are many ways of creating and managing global state in react for example one could choose to use the Context API or Redux.
In this article, I’ll show you how to create and manage local state in a function component using the useState react hook. I will cover global state management in a subsequent article.
What are React Hooks?
You might have asked yourself this question already, so I’d like to pause a bit to explain what hooks are in React.js.
React hooks are in-built react functions that give us the ability to manage state and also hook into other react features.
Here is a list of the basic react hooks;
- useState
- useEffect
- useContext. etc
It’s important to note that react hooks are only available for use in React Function components. A function component is basically a JavaScript/ES6 function that returns a React element (JSX).
Creating State with the useState hook
So to create State with the useState hook, we are required to first import the useState function from react at the top level of a React.js function component module as shown in the code snippet below;
// import useState hook
import React, {useState} from 'react';

function SomeComponent(){
//   return some JSX
}
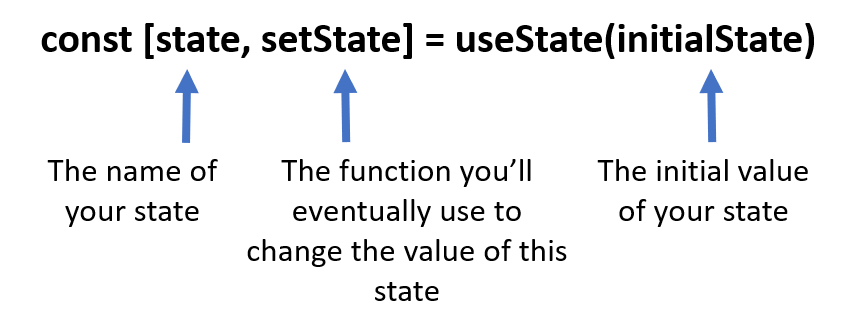
After importing the useState hook/function, we can use it to create state inside the function component. The useState function takes a single parameter which is the initial state value and then returns an array with two values namely;
- State value
- State update function.
We can destructure the array returned by useState to get the state value and the state update function, these can then be used in the component.
The image below illustrates how the destructuring is done.
The code snippet below shows what it would look like after initializing our state. I’ve considered the state to be a count value.
import React, {useState} from 'react':

function SomeComponent(){
    const [count, setCount] = useState(0)

 // return some JSX
}
Looks great!
Let’s now go ahead and create a simple counter component that leverages local state management in react. It’s time to practice what we’ve learned. I suggest that you code along with me.
so let’s go…
Creating a Counter Component. 🚀
First and foremost, we need to create a new react app using the create-react-app tool. So head over to your terminal/cmd window and then type the following command.
npx create-react-app counter-app
Learn more about setting up a react-app here
After the setup of the new react app completes, you can open the project folder in your favorite code editor i.e. Visual Studio Code, and do the following;
1: Create a counter component;
Inside the src folder of your create app, go ahead and create a new file named Counter.js. In that file, create a function component called Counter that looks like this.
import React from 'react';

function Counter(){
  return (
    <div>
      <h1>Count Value</h1>

      <button>Increase</button>
      <button>Decrease</button>
    </div>
  )
}

export default Counter;
2: Create the count state value;
Using the useState hook, create a state value called count and initialize it with a value of 0 (Zero). Then update the h1 element with the text content, “Count Value”, so that it holds the count state value. Your code should look like this;
import React, {useState}from 'react';

function Counter(){
  const [count, setCount] = useState(0)

  return (
    <div>
      <h1>{count}</h1>

      <button>Increase</button>
      <button>Decrease</button>
    </div>
  )
}

export default Counter;
3: Create two functions; increaseCount and decreaseCount;
There are two buttons in the JSX of the Counter component. One is for increasing and the other for decreasing the count state value. These buttons need to have onClick event handlers that will be used to update the count state accordingly.
The functions increaseCount and decreaseCount will be used as the event handlers and so they are created right above the return statement.
Each function uses the setCount function to update the count state value by calling the setCount function with a new value for count based on the current count state value as shown below.
import React, {useState} from 'react';

function Counter(){
  const [count, setCount] = useState(0);

  function increaseCount(){
    setCount(count+1);
  }

  function decreaseCount(){
    setCount(count-1);
  }

  return (
    <div>
      <h1>{count}<h1>

      <button onClick={increaseCount} > Increase </button>
      <button onClick={decreaseCount} > Decrease </button>
    </div>
  )
}

export default Counter;
Note that the two functions increaseCount and decreaseCount are added as onClick event handlers for the increase button and the decrease button respectively.
4: Import the Counter App into the App.js Component;
It’s time to integrate the Counter App into the main component —App.js. This is what your App.js** Component should look like;
import React from 'react';
import Counter from './Counter';
import './App.css';

function App(){
  return (
    <div className="App">
      <h1>Counter App</h1>
      <Counter/>
    </div>
  )
}

export default App;
Finally, after this is done, go ahead and spin up your react application using the npm start command in the terminal.
When the app starts successfully, you should be able to see the counter app look something like this below. The Count value starts from zero as the initial value and can be increased by clicking on the increase button or decreased using the decrease button.
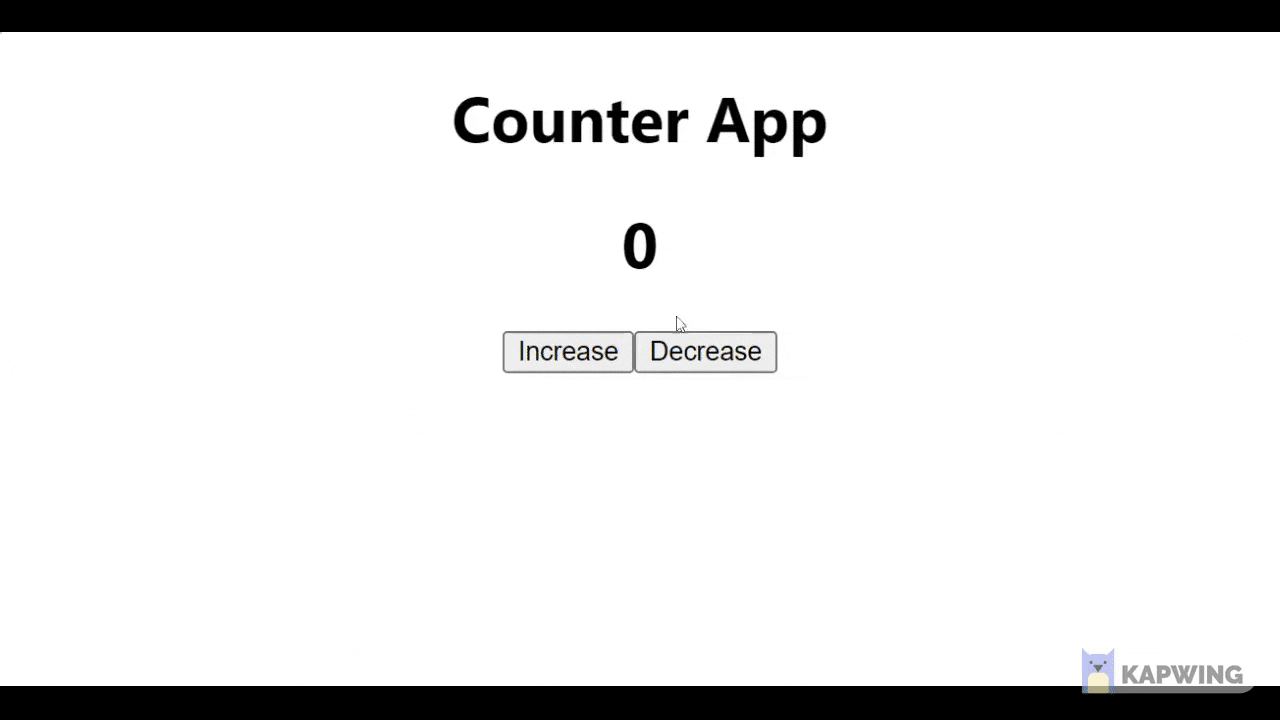
It’s important to note that in react, a component gets re-rendered when the state it depends on updates. This is true for our Counter component because you’ll notice a new count value display when any of the buttons are clicked because those buttons update the count state value which triggers a re-render for the Counter component.
Alright, well done…🎉🎉. Am glad you made it to the end of this article.
I hope it has helped you understand the React state and how it’s used. Let me know what you think in the comments section.